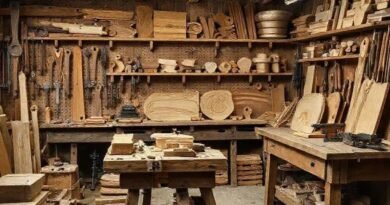
Woodworking projects for men to build at home: unleash your creativity
Woodworking projects for men to build at home include making shelves, furniture, and decorative items, and joining woodworking communities for inspiration can enhance skills and creativity.
If you’ve ever thought about getting into woodworking, you’re in the right place! Woodworking projects for men to build at home aren’t just about crafting; they’re also a way to express your creativity. Imagine the satisfaction of creating something with your own hands—doesn’t that sound exciting?
exploring the best woodworking projects for beginners
When it comes to exploring the best woodworking projects for beginners, starting simple is key. By choosing easy-to-follow designs, you can build your skills while creating functional items for your home.
Simple Projects to Get Started
Begin with projects like a wooden bookshelf or a small bench. These projects help you learn basic techniques, including measuring, cutting, and assembling wood.
Useful Resources for Beginners
Online platforms like YouTube and woodworking blogs offer tutorials that guide you through each step, making learning engaging and less daunting. Don’t hesitate to seek out forums or local workshops for hands-on experience.
Essential Tools for Beginners
Invest in a few essential tools such as a hand saw, drill, and sander. You don’t need a fully equipped workshop to start; just a few good tools can make a big difference.
Choosing the Right Wood
Consider using softwoods, such as pine or cedar, which are easier to work with and more affordable. These types of wood are ideal for crafting beginner projects while you’re honing your skills.
Staying Safe While Working
Always prioritize safety by wearing protective eyewear and following proper tool usage guidelines. Understanding safety procedures makes the work environment safer and more enjoyable.
essential tools every woodworker needs

Having the right tools is crucial for any woodworker. Here are the essential tools every woodworker needs to get started.
Measuring Tools
A measuring tape is fundamental for accurate measurements. A square helps ensure your cuts are straight, while a level makes sure everything is even during assembly.
Cutting Tools
The basic hand saw is necessary for simple cuts, but a power saw, like a circular saw, can speed up the process. Consider investing in a jigsaw for more intricate shapes.
Drilling Tools
A cordless drill is a must-have for drilling holes and driving screws. Make sure to have a variety of drill bits to fit your different projects.
Joinery Tools
Tools like a chisels set and clamps are important for joinery. Clamps hold pieces together while glue dries, ensuring strong bonds.
Finishing Tools
Don’t forget a sander. This tool helps smooth rough surfaces for a polished final look. A good quality sanding block can also be useful for getting into tight corners.
safety tips for woodworking at home
Safety is crucial when working with wood. Here are some safety tips for woodworking at home to help you avoid accidents and injuries.
Always Wear Protective Gear
Before you start, make sure to wear protective eyewear to shield your eyes from dust and debris. Additionally, using a dust mask can help you breathe easier by filtering out airborne particles.
Keep Your Workspace Organized
A tidy workspace can prevent tripping hazards. Keep tools organized and store wood scraps in designated areas. This helps maintain a clear path and reduces the risk of accidents.
Use Tools Properly
Understand how to use each tool safely. Follow the manufacturer’s instructions and don’t skip safety features on equipment. If you’re unsure, look for tutorials or ask someone experienced.
Be Aware of Your Surroundings
Always be aware of what’s around you. Ensure others, including pets, are at a safe distance while you work. This helps minimize distractions and keeps everyone safe.
Handle Wood Carefully
Always support large pieces of wood properly to prevent them from tipping. When cutting, hold the wood firmly and avoid putting your hands near the blade. Using clamps can help secure your materials.
Know First Aid Basics
It’s wise to have a basic understanding of first aid. If an injury occurs, knowing how to treat it can prevent further complications. Keep a first aid kit close by for quick access.
step-by-step guide to building a woodworking bench

Building a woodworking bench can be a rewarding project. Here’s a step-by-step guide to building a woodworking bench that will help you create a sturdy and functional workspace.
Materials Needed
Gather the following materials: 2×4 lumber for the frame, 3/4 inch plywood for the top, wood screws, wood glue, and sandpaper for finishing.
Tools Required
Ensure you have the right tools: a circular saw, drill, square, measuring tape, and a sander. These tools will help you accurately cut and assemble the bench.
Step 1: Measure and Cut the Lumber
Measure the desired length and width of your bench. Cut the 2×4 lumber for the frame accordingly. Make sure to double-check your measurements before cutting.
Step 2: Assemble the Frame
Using the cut pieces, assemble the rectangular frame by attaching the longer pieces to the shorter ones at the corners with wood screws. Ensure everything is square using your square tool.
Step 3: Attach the Legs
Cut four pieces of 2×4 to the desired height for the legs. Attach each leg to the corners of the frame using wood screws. Ensure they are securely fastened.
Step 4: Add the Top
Cut the plywood to the size of your frame. Center it on top of the frame and secure it using wood screws. This will create a solid surface for your woodworking tasks.
Step 5: Sand and Finish
Use sandpaper to smooth all edges and surfaces. This ensures there are no splinters that could cause injuries. Optionally, apply a finish to protect the wood.
fun woodworking projects for home decor
Enhancing your living space can be both fun and creative with fun woodworking projects for home decor. Here are some engaging ideas to inspire your next project.
Wooden Picture Frames
Creating custom wooden picture frames is a great way to display your memories. Choose different wood types for unique styles or paint them to match your decor.
Decorative Shelves
Building decorative shelves not only provides storage but also adds character to your room. You can design floating shelves or angled brackets based on your space’s style.
Rustic Candle Holders
Make rustic candle holders by cutting wood blocks into various sizes. Drill holes to fit tea lights or thick candles, and sand them for a smooth finish. These add warmth and charm to any room.
Wooden Wall Art
Create unique wooden wall art pieces by assembling different wood shapes or patterns. A simple wooden sign with a quote can also bring a personal touch to your space.
Coasters and Trivets
Crafting wooden coasters and trivets is an easy way to combine functionality with style. Use your favorite wood and finish them with a protective coat to prevent water damage.
Plant Stands
If you love plants, consider building a wooden plant stand. This project can add height to your plants, making them a focal point in your home decor.
how to choose the right wood for your projects

Choosing the right wood is essential for the success of your projects. Here’s a guide on how to choose the right wood for your projects.
Consider the Type of Project
First, think about what you are building. Different projects require different types of wood. For example, softwoods like pine are great for furniture, while hardwoods like oak or maple are better for durable pieces.
Evaluate the Wood Characteristics
Wood varies in color, grain, and texture. Decide if you want a smooth finish or a more rustic look. Different woods also have different levels of density, which affects their strength and durability.
Determine the Wood’s Purpose
If your project will be exposed to moisture, consider using a wood that withstands weather conditions, like cedar or redwood. For indoor projects, many hardwoods can provide a beautiful aesthetic.
Know Your Budget
Pricing can vary widely between types of wood. Softwoods are generally less expensive, while some hardwoods can be costly. Determine your budget before you begin shopping.
Source Quality Wood
It’s important to buy from a reputable source. Look for wood that is straight, with minimal knots or defects. This will make your project easier to work with and give a better final product.
Consider Sustainability
Look for local hardwoods or seek out sustainable wood options. This can help lessen your environmental impact and support local businesses.
tips for finishing and maintaining your wooden creations
Finishing and maintaining your wooden creations is vital for durability and appearance. Here are some essential tips for finishing and maintaining your wooden creations.
Choose the Right Finish
Selecting the right finish is crucial. Options include varnish, stain, and polyurethane. Each provides different levels of protection and appearance. Test finishes on a small area to see how it affects the wood color.
Prepare the Surface Properly
Before applying any finish, ensure the surface is clean and smooth. Sand it with fine-grit sandpaper to remove any rough spots or imperfections. Wipe off dust with a damp cloth to ensure a good bond.
Apply Finishes Evenly
When applying finishes, use a brush or rag for even coverage. Apply in thin coats and allow adequate drying time between applications. This helps achieve a smooth and professional-looking finish.
Regular Cleaning and Dusting
To maintain your wooden items, regularly dust them using a soft cloth. This prevents dirt buildup and keeps them looking their best. For deeper cleaning, use a damp cloth with mild soap, avoiding harsh chemicals.
Keep Away from Direct Sunlight
Prolonged exposure to direct sunlight can cause fading and damage. Place wooden creations away from bright light, or use window treatments to protect them. This helps preserve their color and integrity.
Reapply Finish as Needed
Depending on the use, your wooden items may require reapplication of finish over time. Check for signs of wear or damage and apply a new coat to enhance protection and appearance.
joining woodworking communities for inspiration

Joining woodworking communities can provide invaluable inspiration and support for your projects. Here’s why and how to get involved in these communities.
Why Join a Woodworking Community?
Being part of a woodworking community allows you to connect with like-minded individuals who share your passion. You can share ideas, learn new techniques, and find motivation.
Online Platforms
Many woodworking communities exist online. Websites, forums, and social media groups offer spaces for discussions, advice, and showcasing projects. Platforms like Instagram and Facebook host vibrant woodworking groups where you can share your work and get feedback.
Local Workshops and Clubs
Check for local woodworking clubs or workshops in your area. These offer hands-on experiences and the chance to meet fellow woodworkers face-to-face. Participating in workshops can greatly enhance your skills.
Attend Woodworking Events
Look for woodworking shows, fairs, or expos. These events are great for meeting professionals and enthusiasts alike. You can discover new tools and techniques while expanding your network.
Benefit from Shared Knowledge
In these communities, you can gain insights from others’ experiences. Whether you’re a beginner or an expert, sharing knowledge enriches your skills and inspires new ideas.
Contribute to the Community
As you grow, consider giving back to the community. Share your projects, tips, and tricks. Contributing helps others while building your reputation and expertise within the community.
In conclusion, woodworking is a rewarding and creative hobby
Engaging with woodworking communities provides inspiration and support that can enhance your projects. By connecting with others, you can learn new skills, share ideas, and discover innovative techniques.
Whether through online forums, local clubs, or woodworking events, there are many ways to immerse yourself in this craft. Remember to choose the right wood for your projects and properly finish and maintain your creations to ensure they last.
So grab your tools, join a community, and let your creativity flourish in woodworking!
FAQ – Frequently Asked Questions about Woodworking Projects
What are some beginner woodworking projects I can start with?
Beginner projects like a wooden picture frame, simple shelves, or a small bench are great ways to start learning woodworking skills.
How can I maintain my wooden furniture?
To maintain wooden furniture, regularly dust it, clean with a damp cloth, and apply a protective finish every few years to keep it looking great.
What type of wood is best for furniture making?
Hardwoods like oak, maple, and cherry are often best for furniture due to their durability and attractive grain patterns.
How do I finish my woodworking projects?
You can finish your projects using options like stain, varnish, or polyurethane. Always sand the wood first for a smooth finish and apply in thin layers.
Why should I join woodworking communities?
Joining woodworking communities allows you to share ideas, learn from others, find inspiration, and receive feedback on your projects.
What tools do I need to start woodworking?
Basic tools include a measuring tape, saws, drills, clamps, and sanders. As you progress, you can expand your tool collection.