How to organize a small woodworking workshop for maximum efficiency
To effectively organize a small woodworking workshop, focus on maximizing vertical space, implementing efficient storage solutions, ensuring proper safety standards, and incorporating modern technology to enhance productivity and streamline your process.
Have you ever thought about how a well-organized space can transform your craft? How to organize a small woodworking workshop is more than just a task—it’s an art. Let’s dive into practical strategies that can elevate your woodworking experience.
Choosing the right workspace
Choosing the right workspace is essential for a small woodworking workshop. A well-planned area can enhance productivity and ensure your safety during projects.
First, consider location. A space that is well-ventilated and away from disturbances is ideal. Natural light can also boost your mood and help you see details clearly while working.
Next, evaluate the size of your workshop. It should be big enough to accommodate your tools and allow for safe movement. Keep in mind that you need extra space for large projects and the ability to maneuver materials.
Flooring is another important aspect. Choose durable materials that can withstand heavy equipment and spills. A non-slip surface is also advisable to maintain safety while you work.
Additionally, think about accessibility. Ensure your workbench and materials are within reach to minimize unnecessary movement. An organized layout can significantly improve your workflow.
Finally, consider your personal comfort. Invest in a good chair and proper lighting. The more comfortable you are, the more enjoyable and productive your woodworking sessions will be.
Essential tools for woodworking

Having the right tools is vital for any woodworking workshop. Each tool plays a crucial role in helping you create beautiful and functional projects.
First on the list is the table saw. This powerful tool allows you to make precise cuts quickly, which is essential for larger pieces of wood.
Next, consider investing in a miter saw. This tool is perfect for making angular cuts, particularly for trim work and picture frames. Its accuracy helps achieve clean and professional-looking edges.
The router is another essential tool. It’s used for hollowing out areas in wood and can create decorative edges and grooves, adding detail to your projects.
Don’t forget about the hand tools like chisels and planes. While power tools are efficient, hand tools provide a level of control that can be very beneficial, especially for fine details.
The drill is also an important addition. A good quality drill can help with creating holes for screws and other fasteners, making assembly easier and stronger.
You should also have a reliable sander. Sanding is crucial for finishing your work, making surfaces smooth, and preparing wood for painting or staining.
Lastly, consider a workbench. A sturdy workbench provides a solid surface for your projects and can include features like vises and storage, enhancing convenience.

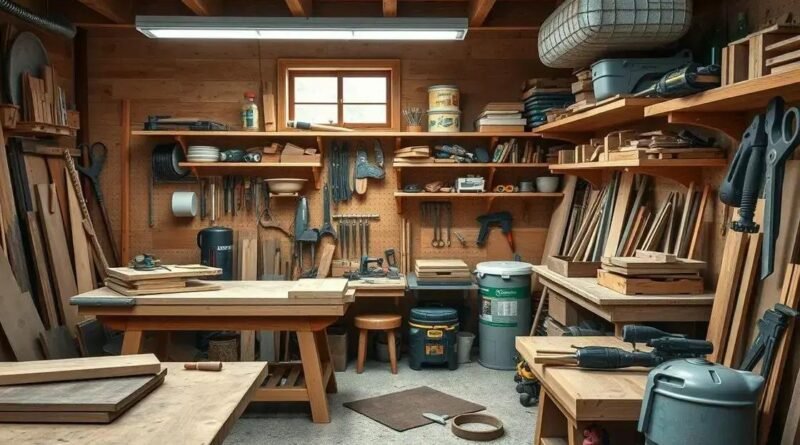
Storage solutions for a small workshop
Effective storage solutions are key to keeping a small woodworking workshop organized and functional. A clutter-free space allows you to focus more on your projects.
Start with wall-mounted shelves. These shelves help utilize vertical space by keeping tools and materials off the floor. Make sure they are easily accessible for your needs.
Another great option is using pegboards. They allow you to hang tools in a visible and organized manner, making it easy to find what you need quickly.
Consider investing in storage bins for small items such as screws and nails. Labeling each bin will help you locate them without wasting time searching.
Workbenches with built-in storage can be incredibly useful. They provide a flat working area while also offering drawers or shelves for convenience.
Mobile carts are another smart solution. These can be moved around the workshop as needed, allowing you to keep essential tools close at hand while working on different projects.
Don’t forget about cabinets. They can be used to store larger tools and equipment, keeping them safe and organized. Make sure the cabinets are sturdy and fit well in your workspace.
If you have the space, consider a storage loft. This allows you to keep less frequently used items up high, freeing up valuable floor space.
Designing an efficient layout

Designing an efficient layout for your small woodworking workshop is crucial for maximizing productivity and safety. A well-planned space can help you move freely and find tools easily.
Start by sketching a floor plan. Include key areas like your workbench, tool storage, and assembly space. Visualizing your layout can help with space optimization.
Ensure that your workbench is centrally located. This makes it easier to access tools and materials. Keep it clear of clutter to maintain focus on your tasks.
Consider the flow of movement. Arrange tools and equipment so that you can move from one task to another without unnecessary steps. This can save you time and effort.
Include space for wood storage. Keeping your lumber organized and within reach will streamline your workflow. Vertical storage options can save floor space.
Lighting is also an important factor. Make sure your layout allows for adequate lighting over the work area. This helps you see details clearly and work safely.
Finally, make adjustments as you go. As you work in your shop, you may find better ways to arrange your tools. Be flexible and willing to change your layout for improved efficiency.
Lighting considerations for woodworking
Proper lighting is essential for effective woodworking. Good lighting helps you see details clearly and prevents accidents while working with tools.
Start with natural light. If possible, position your workspace near windows that allow daylight to flood in. This not only boosts mood but also provides excellent illumination for detail work.
For areas that lack adequate natural light, overhead lighting is crucial. Use bright LED fixtures that light up the entire workspace evenly. Avoid shadows that can make it difficult to see your projects.
Consider adding task lighting where precision is important. A small lamp or adjustable spotlight can help illuminate your workbench when you need focused light on specific areas.
Also, think about the color temperature of your lights. Warmer lights can create a cozy atmosphere, while cooler lights are better for detail work as they show true colors more accurately. Aim for a color temperature of around 4000K to 5000K.
Don’t forget about personal comfort. Avoid glare and reflections by positioning lights properly. Use diffusers or shades to soften bright lights and make them easier on the eyes.
Finally, consider incorporating dimmer switches. This allows you to adjust lighting levels according to the task at hand, helping to reduce eye strain while working for long periods.
Maintaining safety standards

Maintaining safety standards in your woodworking workshop is crucial to prevent accidents and injuries. Proper safety measures can ensure a productive environment.
First, always wear personal protective equipment (PPE). This includes safety goggles, dust masks, and hearing protection. These items help shield you from dust, debris, and loud noises.
Maintain a clean workspace. Regularly clean up wood shavings, sawdust, and other debris to prevent slips and falls. A tidy area also makes it easier to find tools and materials.
Ensure that all tools and machines are in good working condition. Regularly inspect your equipment and perform maintenance as needed. This helps avoid breakdowns and potential hazards while operating tools.
Follow all manufacturer guidelines for tool use. Understanding how to use each tool safely can greatly reduce the risk of accidents. Take the time to read manuals and receive proper training if necessary.
Utilize safety guards on your machines. These guards can prevent fingers and hands from getting too close to moving parts, which is key for safe operation.
Establish a first aid station in your workshop. Having basic supplies on hand can be a lifesaver in case of minor injuries. Make sure everyone knows where it is located.
Finally, create clear safety protocols for everyone using the workshop. Training and regular reminders can help maintain awareness of safety standards amongst all users.
Maximizing vertical space
Maximizing vertical space in your woodworking workshop is a smart way to optimize your area. By utilizing walls and height, you can keep your workspace organized and efficient.
Start by installing wall shelves. These shelves can hold tools, materials, and supplies, freeing up floor space. Ensure they are securely mounted and accessible for ease of use.
Overhead storage is another excellent option. Use the ceiling for storing less frequently used items, like seasonal materials or larger tools. Consider using sturdy racks or platforms.
Implement pegboards for tools. By hanging small tools and accessories on a pegboard, you keep them visible and accessible while saving valuable countertop space.
Use cabinets that go up to the ceiling. Tall cabinets can store a variety of items, from power tools to finished projects, keeping them out of the way but still easy to reach.
Consider rolling storage carts that slide under benches or tables. When not in use, these carts can be tucked away, but can also be rolled out for quick access to your supplies.
Finally, use hooks and brackets to hang hoses, cords, and even ladders. Keeping these items off the floor prevents tripping hazards and maximizes your available working space.
Incorporating technology in your workshop

Incorporating technology in your woodworking workshop can enhance productivity and streamline your processes. Modern tools and software can significantly improve your efficiency.
Start by utilizing digital measuring tools. Laser measures and digital calipers provide precise measurements, reducing errors in cutting and assembly.
Consider investing in a CNC machine. This computer-controlled tool can automate cutting, shaping, and engraving, enabling you to create intricate designs that would be challenging by hand.
Use to plan your projects. Software like SketchUp or Fusion 360 allows you to visualize your ideas in 3D before starting, helping to identify potential problems early on.
Integrating smart tools that connect to apps can help you monitor and control your equipment remotely, improving efficiency and facilitating maintenance.
Dust collection systems equipped with sensors can help maintain air quality by automatically turning on when you start working, ensuring a cleaner and safer environment.
Don’t forget about video tutorials and online courses. These resources can expand your skills and knowledge, helping you stay updated with the latest woodworking techniques and trends.
Lastly, establish a database for your projects, materials, and tools using management software. Keeping track of inventory and project history can save time and reduce waste.
In summary: Organizing your woodworking workshop
Organizing a small woodworking workshop effectively can greatly enhance your creativity and productivity. From implementing smart storage solutions to incorporating modern technology, each step plays a vital role in optimizing your space.
Safety should always be a priority. By maintaining safety standards and ensuring proper lighting, you create a workspace where you can focus on your craft without worry.
Remember, maximizing vertical space and designing an efficient layout are key to utilizing every inch of your workshop. These strategies can help keep your tools organized and accessible.
As you explore new tools and techniques, don’t hesitate to adapt and change as needed. Every workshop is unique, and the best organization method is one that works for you. Embrace the process and enjoy the journey of woodworking!
FAQ – Frequently Asked Questions about Organizing a Woodworking Workshop
What are the best storage solutions for a small woodworking workshop?
Wall-mounted shelves, pegboards for tools, and rolling carts are excellent storage solutions that help maximize space.
How can I ensure safety in my workshop?
Wearing personal protective equipment (PPE), keeping a clean workspace, and using tools according to manufacturer guidelines are key to ensuring safety.
What technology can I incorporate into my workshop?
Integrating digital measuring tools, CNC machines, and woodworking design software can enhance productivity and precision.
Why is proper lighting important in my workshop?
Good lighting helps reduce errors, prevents accidents, and allows you to see details clearly while working.
How can I maximize vertical space in my workshop?
Utilize wall shelves, overhead storage, and hooks for tools and cords to make the most of your vertical space.
What should I consider when designing my workshop layout?
Ensure that your workbench is centrally located, maintain an efficient flow of movement, and allocate space for tools and materials.